For a couple of times, I've been asked to print huge pictures using a regular home printer so that I would first have to split the photo into parts. At first I thought it was going to be simple but then I realized that I need to consider an overlap in each of the sections so that they can be glued together.
So in this tutorial, I'll share the steps I took in using Photoshop to split an image into multiple pages (layers) such that each of the sections will have an overlap for you to easily put your poster together.
Details
- Done in Photoshop CS3
Step 1: Setting up your image.
Open your image in Photoshop. Go to File » Open then navigate to the location of your image.
I made myself a quick Hello streetlight! poster to use for this tutorial. In case you're curious, the font used is Shortcut by Misprinted Type.
Step 2: Setting up the canvas size.
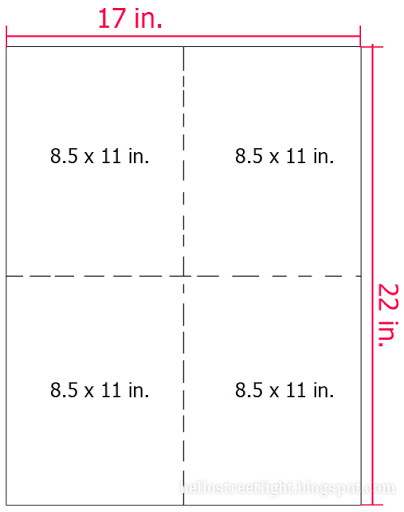
Setup the canvas size based on the paper size you will printing on. For this sample, I will be using four letter-sized papers (8.5 x 11 in.) such that the image will be split into four parts -- two at the top and two bottom. So now, the new canvas size will be 17 x 22 inches.
 The poster will be split into four letter-sized (8.5 x 11 in.) papers.
To adjust the canvas size, go to Image » Canvas Size (Ctrl+Alt+C). Then in the Canvas Size window, uncheck Relative and set the unit to inches. Enter your new width and height - in my case, 17 for the width and 22 for the height - then click OK.
Don't worry if your image was cropped after applying the new canvas size. This will be fixed later.
Step 3: Marking the canvas' sections.
Next is dividing the canvas into page-sized sections using guides.
To create the guides, go to View » New Guide. Select Vertical and enter the paper's (or page) width, 8.5 in., then click OK. Create another guide (View » New Guide) set to Horizontal and enter the paper's height, 11 in., then click OK.
Adding two guides is enough. As you can now see, the canvas is divided into the four sections we planned earlier.
 Add guides to divide the poster into four letter-sized sections.
TIP: Since dividing the canvas into the four sections is just the same as marking the center, you can just use 50% on each of the Vertical and Horizontal guides instead of the paper's width and height.
Step 4: Adding margins for getting the overlap.
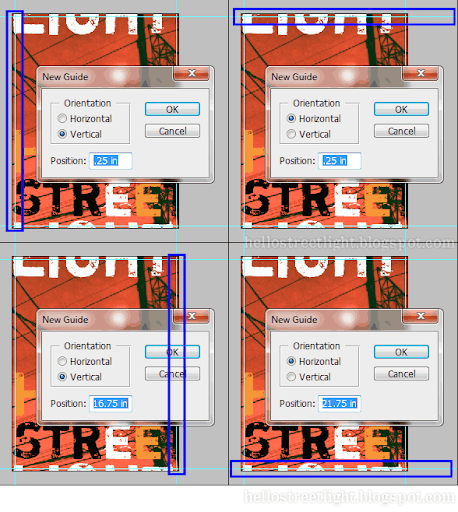
Now we need to add left, top, right and bottom margins. The values to set here will depend on how much overlap you want. I will be using .25 (1/4) inch - just adjust this value as needed.
Create a new guide (View » New Guide) for each of the margins as follows:
- Left: Vertical; .25 in
- Top: Horizontal; .25 in
- Right: Vertical; 16.75 in (subtract .25 from the canvas width, 17 in.)
- Bottom: Horizontal; 21.75 in (subtract .25 from the canvas height, 22 in.)
 Add guides (1/4 inch margin) at the top, right, bottom and left.
After adding all the guides, we now have the following:
 Added all the necessary guides.
Step 5: Fitting the image inside the margins.
Next step is to make sure the entire image is inside the margins we created (i.e. top, left, right, bottom).
If your image's layer is a Background layer, convert it to a normal layer by Right clicking it then selecting Layer From Background.
 Convert the Background to a normal layer.
A window will pop up allowing you to configure your layer. Just leave it as is. Click OK.
After converting the Background layer, you should have something like this:
Make sure your image is centered. Hit Ctrl+A (Select » All). Vertically center the image by going to Layers » Align Layers To Selection » Vertical Centers. Next, horizontally center the image by going to Layers » Align Layers To Selection » Horizontal Centers. Hit Ctrl+D (Select » Deselect) to remove the selection.
Now we can resize the image. Hit Ctrl+T (Edit » Free Transform). From any corner of the image, hold down Alt then drag towards the center until everything is inside the margins.
 Transform the image to fit inside the margins.
TIP: If you prefer to be more accurate, you can use the options bar at the top instead of clicking and dragging. Enable "Maintain aspect ratio" then enter your width (paper width minus the left and right margins). Further adjust the height if it still doesn't fit.
Step 6: Creating the sections.
In this step we will start creating the sections using the guides.
First make sure you have Snap To Guides enabled. Go to View » Snap To » Guides.
Let's start with the top left section. Switch to the Rectangular Marquee Tool (M) and make a selection on the image starting from the top left corner up to the center guides. Your selection will snap to the guides so don't worry about it being misaligned.
 Select the top left section of the image.
Still using the Rectangular Marquee Tool (M), drag the selection until it snaps to the top and left margins. This adjustment creates the overlap we need when putting the sections together after printing. I highlighted the selection in blue so you can see it better in the figure below.
 Adjust the selection until it aligns to the top and left margin.
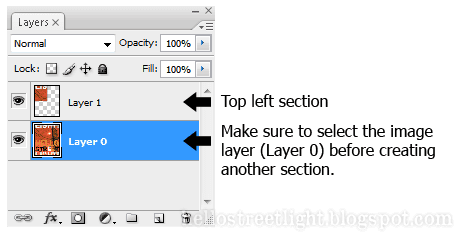
Now hit Ctrl+J (Layer » New » Layer via Copy) to copy the selection onto a new layer.
 Current layers after creating our first section.
We now have our first section. To complete the rest, just go back to your image layer (Layer 0) and repeat this step for each of the three remaining sections (top right, bottom left and bottom right).
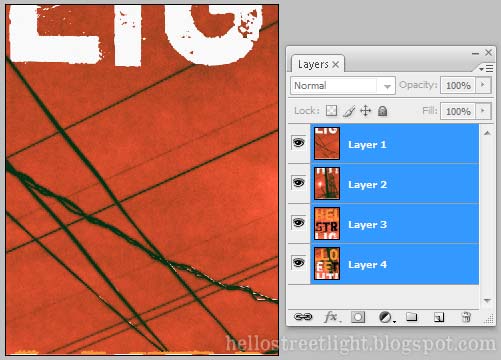
After creating three more layers for the sections, you should now have something similar to this:
 Complete the layers for all the sections.
Step 7: Cropping the image for printing.
Now we're on the last step.
Delete image layer (Layer 0) by dragging it to the Trash icon found at the bottom of the Layers window.
 Delete the image layer (Layer 0).
Next, select all layers (Select » All Layers or Ctrl+Alt+A).
Align them all together by going to Layer » Align » Top Edges followed by Layer » Align » Left Edges.
 Align all the layers together.
Now got to Image » Trim. Set Based On to "Transparent Pixels" and check everything under Trim Away. Hit OK and your image will be trimmed.
And we are done. Once you are ready to print, simply hide the layers you won't be printing and print away!
 Layered file ready for printing.
And that's it. Hope you find this tutorial useful. If there is anything I missed or messed up, just let me know in the comments.
Found this tutorial useful?
Show your support
Any amount is awesome!


This helped so much! Thank you!!!
ReplyDeleteAwesome !!! Saved the day!!
ReplyDeleteYou forgot to fix the trimming which occurred after selecting the canvas size.
ReplyDeleteVery helpful in displaying the sign boards at office. Great and thank you
ReplyDeleteshiva
helpul. :)
ReplyDeleteHi, thanks for this guide! In Step 6, where we create the sections using guides, I could only create new layers via copy for two of my four sections. The other two sections were blank and transparent when the layer was created. Can you think of what I might have done wrong?
ReplyDeleteHi! Seems like you're copying from an empty selection. Are you selecting your image layer (Layer 0) before creating a new layer via copy?
DeleteIf you're on Windows, MS Paint can split images and print too; I just tried it out with a long website screenshot, and in Page setup just did 1 by 5 pages, and it took care of it. Of course you don't get any overlap control, so it might not work for making a poster like this tut says, but if you landed here just wanting to do something like printing a screenshot, MS Paint may do the trick oddly enough.
ReplyDeleteNice tip Jess! Sometimes, it's the simpler programs that get the job done quickly and easily.
Deletei've been trying this method and everything goes according to the guide up until i print it. seems like the images for the lower part are coming out the printer moved a bit to the right, which wouldn't be a problem if it wasn't for the fact that it comes out squished too, if i try aligning the right the left comes short, if i try aligning to the left, the right comes short. it's very weird and i don't want to keep wasting paper trying to do this. any ideas?
ReplyDeleteHi, not sure if this could help but could it be your printer settings? Like the page margins or reduce/enlarge setup?
DeleteWhen you go to print (File > Print), under "Position and Size", check the box for "Scale to Fit Media".
DeleteYou may also need to go to "Print Settings" (at the top of the same dialog), and check or uncheck "Borderless Printing", depending on the type of printer you have.
If this helped anyone, please reply so that you might help other people with the same problem.
Wonderful tutorial, very detailed.
ReplyDeleteSo much appreciated.
Many thanks
Hi I'm stuck on step 5: fitting to the margins. 'Command T' activates the free transform function, but when I hit alt/option and drag the cursor over the image, all it does is drag a 'target' cursor across the canvas but does not alter the image size. Any idea what I'm doing wrong? I'm using a Mac if this helps. Thanks. A.
ReplyDeleteJust to be sure, are you resizing the correct layer (and not an empty one)? What happens if you don't hold down the alt/option key?
DeleteHi. I've only got one layer on the file i'm using - Layer 0. If I use the free transform tool without using alt/option key the whole of the canvas shifts in whatever direction I drag the mouse and the chequered background of PS becomes visible. I'm using CS6 if that is any help.
DeleteNot sure what's causing the problem but you can try entering the size manually similar to the last image in Step 5. I'm not familiar with CS6 though but the option should be around there.
DeleteSorry I did not fully understand what you meant by 'target' cursor earlier. The target cursor means you are re-positioning the layer and not resizing it. Are you dragging on one of the corner handles when doing so? The cursor should look like a double headed arrow.
DeleteThink I got it sorted. I was testing this out using A3 size paper as the baseline, rather that A4 in your example. Many thanks.
ReplyDeleteYour're welcome! Glad to hear it worked out.
ReplyDeleteThanks for the guide.
ReplyDeleteThank you! This was easy to understand and easy to do.
ReplyDeletehey I have 1 question, what if we want to have more than 4 pages? for example 6 pages or more, then how do we Add margins for getting the overlap??
ReplyDeletethx
What if our printer is not connected on the computer I did this with. What type of file should I save it?
ReplyDeleteA PNG or JPG file should work. Just make sure to do it for all the layers.
DeleteThis comment has been removed by the author.
ReplyDeleteThis comment has been removed by the author.
ReplyDeleteThanks I am able to to it for my Sons Photo frame. I wanted to split image into 3x3 pages.
ReplyDeleteThanks
Nirmal
Editor
The Logical News
Thank you! You save my life! Ok, not really... BUUUUUUT you made it a whole heck of a lot easier to make an awesome chalkboard template printout for my baby's first birthday! Your instructions were really easy to follow! You're the best!
ReplyDelete